The long awaited and highly anticipated installation of the wood stove has finally complete. We got this practically new Vermont Castings wood stove with brand new catalytic converter and $200 blower for a steal at $500 on Craigslist. The stove new costs almost $1400. With plenty of scrap wood lying around to burn the work crew has been much happier since its arrival.
It's been a while since I've posted and the house is looking so much different. Piper and the crew have begun working on finish work!! Piper applied several coats of tung oil to the upstairs flooring and it looks beautiful. The color and grain have really come out and it looks tremendous.
The biggest change and one of the most exciting progressions so far has been the putting up of drywall and paneling. Although the stud walls have given us an idea of the layout, it wasn't until the drywall went up that we really saw the house take shape. We installed horizontal tongue and groove pine in the first floor bathroom and to the ceilings of the kitchen.
Despite some frosty walls delaying us a day, we began painting the bathroom so we can install lighting, the sink and medicine cabinet.
We're eagerly awaiting the arrival of the stove pipe roof kit so we can install the wood stove and keep the crew a little toastier during the day.
Part of the excitement of the installation of flooring comes from knowing its history. Almost a year ago, Piper, his dad Eddie and I, took the tractor down to the Far Barn at Currents, a structure that once stood strong at the bottom of the valley. It's roof had caved in and the silo hung off its side.
It was a sad day to see it go, as we often visited its aging tower. It is one of my most cherished and photographed locations, and we are excited to preserve its history in our home. The photos above were taken the day the silo fell. I was glad to have documented the process, a conclusion to its long life. The silo which stood nearly 30 feet tall was constructed of 5 inch wide tongue and groove Redwood planks. Most silos in that time were kits, sent by train from the west coast.
It didn't take much to bring it to the ground, where it fell in an ordered mess. The photo of Piper above, shows the beautiful aftermath, the ladder from shaft and the steel rings that kept its shape.
I created this short silent flick that night and hope you enjoy watching it!
Well, not totally done, but what a surprise to come home to! Piper and Cusi installed half of the floor in our bedroom today. These photos don't really do it justice, as crappy weather made for poor lighting but I was so excited to share.
My favorite part is the view from below. The joists are exposed leaving a great view of the flooring. We painted the underside to match the joists and the flooring upstairs will be sanded and waxed to finish.
Playing a little bit of catch up with the posting, as there hasn't been a whole lot of visible differences on the site in a while. The crew has been hard at work finishing up the plastering, which has proved to be one of the more grueling projects on the house so far.
Dixie brought the sprayer in for the last time, finishing the coats on the upper east and north walls and the upper south side which includes the bathroom dormer. The walls really look fantastic. We ran into an issue on the lower section of the west wall, which unfortunately has set us back and will have to be re-done. The sand in the mix for the final coat of the earth plaster was too fine, causing the layers to crack. Too bad, cause man it looked nice and smooth before it dried! The crew will remove the last layer and reapply a rougher mix. We're hoping to have all the walls complete in the next week or two.
Other exciting projects have been completed recently. We now have electricity run in the house and we've installed a few lights in the kitchen. One of my favorite recent advancements has been the installation of the staircase to the second floor (pictures coming soon) It's amazing how it changed the look of the space.
Piper has been working hard planing down the redwood planks from the old silo to get ready to install as the second story flooring, the next project on the list after the plastering is complete.
The east walls are mostly finished and boy do they look fantastic! The interior needs another coat upstairs and the exterior between the windows need done by hand. The south walls are also looking great, we can really get a sense of what the rooms will look like. The picture shows the south wall of the living room. We also are a few days away from getting power at the site! Moving right along!
The house is really coming along, and cloudy misty days made for a perfect climate to spray the stucco walls. With a crew of 5, we've spent the last few days spraying the lime and portland cement mix to the interior and exterior of the north, south and east walls.
There's certainly a science behind the process, some walls receive just the portland lime mix, while others will only have the earth plaster. It a seriously messy process but all we can see is the beauty the form is taking. Piper made sure I took pictures of just how messy the site was.
The sprayer shoots the mix out onto the walls like large curd cottage cheese and then gets a troweling to create a smooth and beautiful surface. Piper manned the sprayer hose, which when filled with concrete weighs about a whopping 60-100 pounds. Good thing he's a professional strongman.
Hopefully we'll be wrapping up the remaining walls in the next week or so and then on to the interior!!
After lots of prepping, the crew arrived this mornign ready to spray in the first coats of lime plaster. Sprayed on in thin coats, the lime will create a durable finish coat on the house, sealing in the straw bales. The walls are grooved to create a better bond between coats. After teh final coats are done we will be able to tint lime to any color we choose and paint it on. Plaster gun action shots coming soon!
It always amazes me what a group of friends can accomplish in a day. After spending the last week prepping the straw walls for plastering by filling in the gaps and cracks with a slipstraw mixture, several shifts of friends helped us cook along by applying the first layers of earth plaster to the bales walls. We spend the afternoon working a thin mixture of clay, sand and water into the bales and following up with a thicker mix to build up the low spots and even out the surface. We made tremendous progress and are so thankful for all of our friends who came to lend a (now incredibly softer) hand.
We had a great day on Saturday, with a few friends that gathered for a work party. We started the slip-straw process, which fills in the cracks and gaps between the straw bales with straw covered in a thin clay slip. We made great progress and look forward to getting the first layer of plaster up in the next few weeks
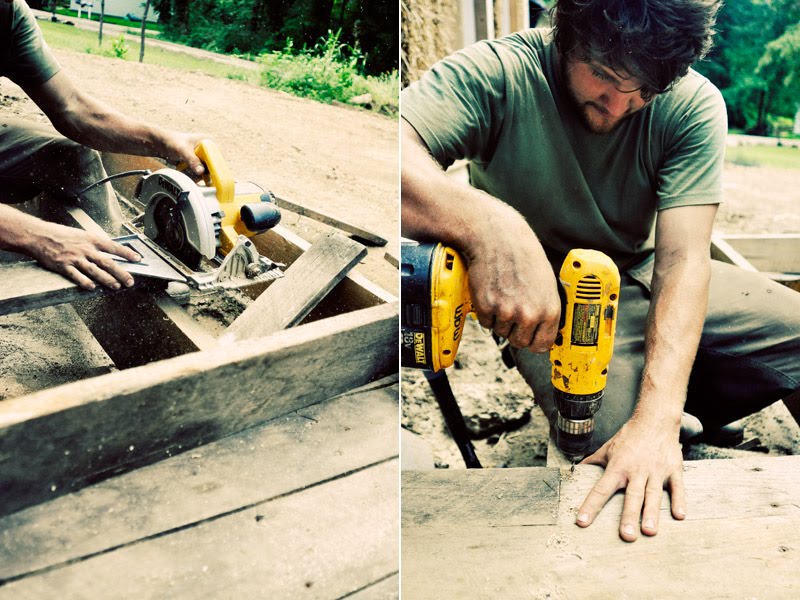
One of my favorite projects so far, Piper began framing up the wrap around porch. With reclaimed oak planks he was able to salvage from another job he's working on, we were able to install about a third of the decking for the porch that will wrap on the North and West sides of the house.
We are using rough cut oak from a local sawyer for the framing and hope to salvage the rest of the oak planks for the remainder of the decking. The porch sits upon poured concrete pillars and will have oak posts and a shed roof that will match up with the East and South sides forming a skirt around the whole facade.
We hope to get this project done soon. Now all we need are some rocking chairs and a few tall glasses of lemonade!
We got our excavator Rusty out again this week to start moving around dirt, working on drainage and digging out trenches for running the electric. With the help of his backhoe, we were able to move the existing electric pole from the west side of the house to the east side of the driveway. Unfortunately with no auger, Piper dug the 5-1/2 foot post hole by hand. My back hurt just watching him. It was pretty cool watching Rusty chain the pole to his bucket and drop it into place.
It was also very exciting to get the front yard leveled out again. The gears in my brain are turning like mad imagining the garden we'll start on next spring. The concrete pillars for the wrap around front porch were dug and poured this week and Piper and I will start framing tomorrow.
We pulled the pine logs off the back hill from the tree we dropped in April and hauled them down to our local sawyer, who will mill them into some wide planks for use in making benches and other random projects.
Rusty will be back again tomorrow and in a few weeks to dig out a root cellar into the hill which will house our homebrew, wines, and canned food. We'll use the clay mined from the dig to add into the plaster mix that will cover the walls of the house.
Trying to get caught up on posting the progress -- sorry to all of you who have been bugging me for more pictures.
The skylights have been installed in both the kitchen and the living room. Three in each with opening ones in the kitchen for ventilation. All of the reclaimed styrofoam insulation has been installed in the stud walls which allows us to really see how the rooms will look.
The last of the shed walls have been framed up which means now we actually have to use the doorways to enter and exit the house. We've got a small crew working on the rest of the straw work. They'll be filling in the gaps with slip straw next week and hopefully will start plastering before the end of the month.
Heavy rains and unbearable heat have kept production at a slow pace the past week or so, but today it snowed!! Well, not really -- but with the weather only in the eighties, and delicate flurries of 6" thick foam insulation sheets that Piper found on Craigslist (for 5 bucks a piece!!) it certainly felt like a vacation.
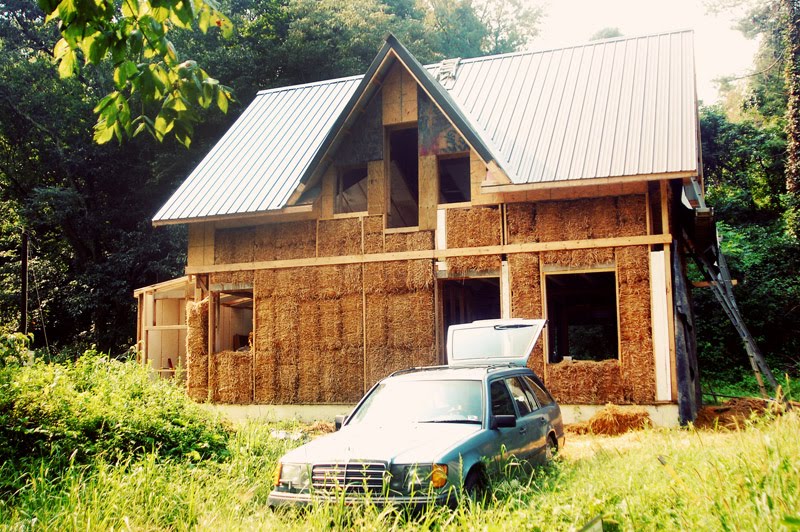
We cut the foam to fit in between the studs on the East and South walls, perfectly nestling into the 2x6 rough cut stud walls. We started to hang the mesh on the exterior which will help the base layer of stucco adhere to the facade. Man, production on these two walls went a lot quicker than stacking straw bales! Look forward to our next house construction blog: House Made of Foam.
After a short break from construction, we're back in the swing of things and have gotten the east kitchen wall and the shed roofs over the east and south sides framed in and ready for metal. The shed over the kitchen contains three skylights as does the south shed over the living room.
We're starting to get a really good sense of the look of the final facade. and are excited at how great it looks. Along the north and west sides of the house, which are the most visible from the road, the shed roof will continue around in the form of a wrap around porch. This construction will come later after walls have been sprayed in. We've been fortunate to have several friends out in the last week to help make putting these sections up very quick.